CocosCreator制作pk转场shader
发表于|更新于
|阅读量:
摘要
根据论坛孙二喵大佬分享的3.x的转场特效进行改成2.4.15可以使用的shader,理论上2.4的都可以使用吧。
开始
效果演示:

使用方法:
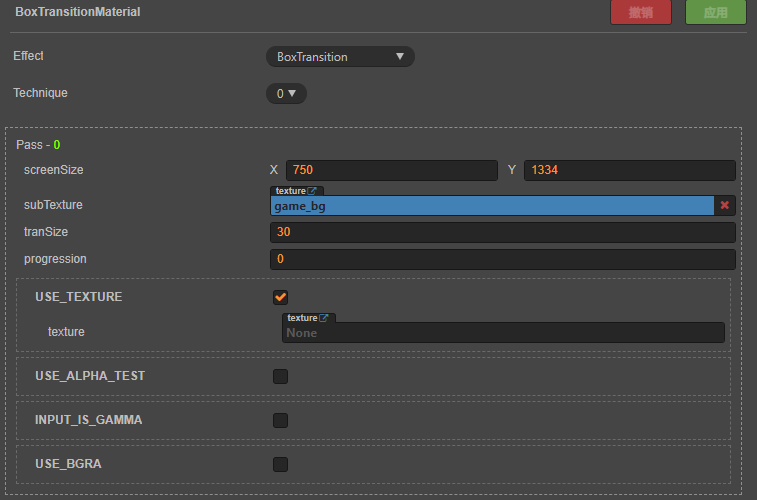
创建一个材质球要选择当前过度场景的shader然后设置图片大小(screenSize),并且选择要过滤到的图像纹理(subTexture),也可以设置方块大小(tranSize)
Shader代码和使用方法:
1
2
3
4
5
6
7
8
9
10
11
12
13
14
15
16
17
18
19
20
21
22
23
24
25
26
27
28
29
30
31
32
33
34
35
36
37
38
39
40
41
42
43
44
45
46
47
48
49
50
51
52
53
54
55
56
57
58
59
60
61
62
63
64
65
66
67
68
69
70
71
72
73
74
75
76
77
78
79
80
81
82
83
84
85
86
87
88
89
90
91
92
93
94
95
96
97
98
99
100
101
102
103
104
105
106
107
108
109
110
111
112
113
114
115
116
117
118
119
120
121
122
123
124
| CCEffect %{
techniques:
- passes:
- vert: vs
frag: fs
blendState:
targets:
- blend: true
rasterizerState:
cullMode: none
properties:
texture: { value: white }
alphaThreshold: { value: 0.5 }
screenSize: { value: [ 720, 1280 ] }
subTexture: { value: grey }
tranSize: { value: 36 }
progression: { value: 0 }
}%
CCProgram vs %{
precision highp float;
#include <cc-global>
#include <cc-local>
in vec3 a_position;
in vec4 a_color;
out vec4 v_color;
#if USE_TEXTURE
in vec2 a_uv0;
out vec2 v_uv0;
#endif
void main () {
vec4 pos = vec4(a_position, 1);
#if CC_USE_MODEL
pos = cc_matViewProj * cc_matWorld * pos;
#else
pos = cc_matViewProj * pos;
#endif
#if USE_TEXTURE
v_uv0 = a_uv0;
#endif
v_color = a_color;
gl_Position = pos;
}
}%
CCProgram fs %{
precision highp float;
#include <alpha-test>
#include <texture>
in vec4 v_color;
#if USE_TEXTURE
in vec2 v_uv0;
uniform sampler2D texture;
#endif
uniform UBO_1 {
vec2 screenSize;
float progression = 0;
float tranSize;
};
uniform sampler2D subTexture;
vec4 BoxTransition(vec4 color, vec4 mixcolor, vec2 uv, float progression) {
vec2 fragCoord = gl_FragCoord.xy;
fragCoord.y = screenSize.y - fragCoord.y;
vec2 blockPos = vec2(progression) * screenSize.xy;
vec2 p = ceil(fragCoord / tranSize) * tranSize;
float progress = (p.x + p.y) / (blockPos.x + blockPos.y);
vec2 v = abs(fragCoord - p + vec2(tranSize / 2.));
if (max(v.x, v.y) * progress < tranSize / 2.) {
color = mixcolor;
}
return color;
}
void main () {
vec4 o = vec4(1, 1, 1, 1);
#if USE_TEXTURE
CCTexture(texture, v_uv0, o);
#endif
vec4 mixColor = vec4(1, 1, 1, 1);
CCTexture(subTexture, v_uv0, mixColor);
o = BoxTransition(o, mixColor, v_uv0, progression);
o *= v_color;
ALPHA_TEST(o);
#if USE_BGRA
gl_FragColor = o.bgra;
#else
gl_FragColor = o.rgba;
#endif
}
}%
|
在需要用到转场过度的地方进行调用代码
1
2
3
4
5
6
7
8
9
10
11
12
13
14
15
16
17
| // 初始值设置为 0
let start = { num: 0 };
// 目标值设置为 1
let end = { num: 1 };
// 获取节点上的Material,各版本可能存在差异
let sprite = this.node.getComponent(cc.Sprite);
let mat = sprite.getMaterial(0);
// 利用tween进行过渡
cc.tween(start)
.delay(0.0010)
.to(1.5, end, {
onUpdate(target:any, ratio:any) {
// 根据动画的进度比例来更新
mat.setProperty("progression", target.num);
},
})
.start();
|

 微信
微信